1. Introduction
In this first hands-on example for Spring Batch, we will create a simple application that will read a CSV file and upload the data in the database. Please note that this is a code walk-through. For details about the components and processing of batch, please visit Spring Batch Basics post.
2. Problem Statement
Let’s upload a CSV file with name product-data.csv in the PRODUCT table of the database; this file contains product name, description, and price separated by a comma.
3. Summary of Steps
To solve this problem, we will be using Spring Boot 2.1.7 and follow below steps-
- EnableBatchProcessing
- Define a Job
- Define a Step with reader, processor & writer. Along with a listener
4. Required Dependencies
- spring-boot-starter-batch: This will bring in batch dependencies like Job, Step, JobBuilderFactory, StepBuilderFactory, etc.
- spring-boot-starter-data-jpa: To communicate with Database
- com.h2database: in-memory database, this is used for development/demo purpose only
- spring-boot-devtools: This will give us console to query tables of the h2 database.
5. Code walkthrough
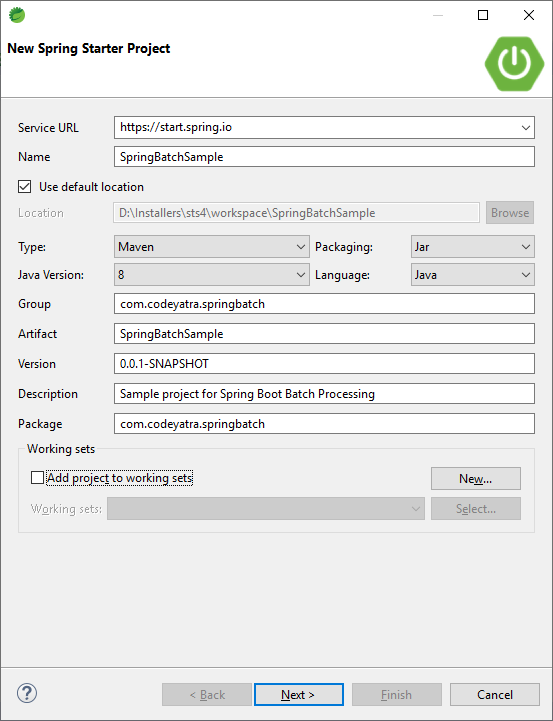
- First of all, we need to create a spring boot application. The below screenshot shows the configuration of the project in STS:

- Add below dependencies in pom.xml file:
    <dependency>
        <groupId>org.springframework.boot</groupId>
        <artifactId>spring-boot-starter-batch</artifactId>
    </dependency>
    <dependency>
        <groupId>org.springframework.boot</groupId>
        <artifactId>spring-boot-starter-data-jpa</artifactId>
    </dependency>

    <dependency>
        <groupId>org.springframework.boot</groupId>
        <artifactId>spring-boot-devtools</artifactId>
        <scope>runtime</scope>
        <optional>true</optional>
    </dependency>
    <dependency>
        <groupId>com.h2database</groupId>
        <artifactId>h2</artifactId>
        <scope>runtime</scope>
    </dependency>
    <dependency>
        <groupId>org.springframework.boot</groupId>
        <artifactId>spring-boot-starter-test</artifactId>
        <scope>test</scope>
    </dependency>
    <dependency>
        <groupId>org.springframework.batch</groupId>
        <artifactId>spring-batch-test</artifactId>
        <scope>test</scope>
    </dependency>
    <dependency>
        <groupId>org.springframework.boot</groupId>
        <artifactId>spring-boot-starter-web</artifactId>
</dependency>- Add a configuration file– Create a file with name BatchConfig:
- Add @Configuration annotation, to register the same as a config file with the environment
- Add @EnableBatchProcessing annotation, to enable batch processing in our application and give us JobBuilderFactory and StepBuilderFactory classes, which we can directly autowire in our configuration File
- We will revisit the configuration file later in this article as we need some other components before configuring the actual Job.
@Configuration
@EnableBatchProcessing
public class BatchConfig {

    @Autowired
    JobBuilderFactory jobBuilderFactory;

    @Autowired
    StepBuilderFactory stepBuilderFactory;
}
- Create a Model– Create a Product class, to map the file columns to database columns.
public class Product {
    private String productName;
    private String productDescription;
    private double price;
}
It is a POJO class with fields like productName, productDescription, and price.
- Create a Reader– A ProductReader will extend Spring’s FlatFileItemReader class. We need to configure below components in the reader:
- LineMapper: It is an interface that is used to map a line with a domain object. Here, we are using DefaultLineMapper that is an out-of-box mapper provided by Spring. The DefaultLineMapper first tokenizes the line into FieldSet and then maps the Fields into the domain object.
- Line Tokenizer: It is an interface that breaks the line into tokens, for this, we are using DelimitedLineTokenizer, which uses a delimiter (a comma in our case), and based on a delimiter, it tokenizes the line.
- FieldSetMapper: It is an interface that is responsible for the mapping of a FieldSet into the domain object. We are using BeanWrapperFieldSetMapper, which is also an out-of-box implementation of FieldSetMapper. It automatically maps the fields by its matching name, using specifications given by JavaBeans. For example, it will look for the setter method for the productName field as setProductName(String productName) and then populate the Model object. Here, please note that the scope of the Model has to be PROTOTYPE.
@Component("productReader")
public class ProductReader extends FlatFileItemReader<Product> {
    DefaultLineMapper<Product> productMapper = new DefaultLineMapper<Product>();
    DelimitedLineTokenizer productTokenizer = new DelimitedLineTokenizer(",");
    BeanWrapperFieldSetMapper<Product> beanWrapperFieldSetMapper = new BeanWrapperFieldSetMapper<Product>();

    public ProductReader() {
        Resource localResource = new ClassPathResource("product-data.csv");
        super.setResource(localResource);

        productTokenizer.setNames(new String[] { "productName", "productDescription", "price" });
        beanWrapperFieldSetMapper.setTargetType(Product.class);
        productMapper.setFieldSetMapper(beanWrapperFieldSetMapper);
        productMapper.setLineTokenizer(productTokenizer);
        super.setLineMapper(productMapper);

    }
}- Create a Processor– ProductProcessor, this will implement the ItemProcessor interface of spring. It is an interface that will have our business logic and it has a process method that consumes an object, performs some operation on it and returns the same / another object to the writer. Here, we are just altering the description of product objects, but in a real application, this can have complex business logic.
@Component("productProcessor")
public class ProductProcessor implements ItemProcessor<Product, Product> {
    @Override
    public Product process(Product product) throws Exception {
        String productName = product.getProductName()
            .toUpperCase();
        String productDescription = product.getProductDescription();
        if (productDescription.isEmpty()) {
            productDescription = "Dummy Description for: " + productName;
        }

        Product updatedProduct = new Product(productName, productDescription, product.getPrice());
        return updatedProduct;
    }

}- Create a Writer– We will use out-of-box writer builder – JdbcBatchItemWriterBuilder given by Spring Batch and inject it in the config file, and provide the insert statement which will be executed automatically by spring container.
    @Bean
    public JdbcBatchItemWriter<Product> writer(DataSource dataSource) {
        return new JdbcBatchItemWriterBuilder<Product>().itemSqlParameterSourceProvider(new BeanPropertyItemSqlParameterSourceProvider<>())
            .sql("INSERT INTO product (product_name, product_description, price) VALUES " + "(:productName, :productDescription, :price)")
            .dataSource(dataSource)
            .build();
}- Create Listeners– Spring Batch has provision to specify Listeners for various lifecycle events of a Job. Say, we want to invoke some code before/after invoking a Job or a Step. Here, we are showing two listeners JobCompletionNotificationListener and StepCompletionNotificationListener, currently, it has only loggers but it can have business logic.
@Component("jobCompletionNotificationListener")
public class JobCompletionNotificationListener extends JobExecutionListenerSupport {
    private static Logger logger = LoggerFactory.getLogger(JobCompletionNotificationListener.class);
    @Override
      public void beforeJob(JobExecution jobExecution) {
		logger.error("============before job================");
	}

	@Override
	public void afterJob(JobExecution jobExecution) {
		logger.error("============after job================");
	}

}
@Component("stepCompletionNotificationListener")
public class StepCompletionNotificationListener implements StepExecutionListener {

	Logger logger = LoggerFactory.getLogger(StepCompletionNotificationListener.class);

	@Override
	public ExitStatus afterStep(StepExecution stepExecution) {
		logger.error("************after step****************");
		logger.error("Step Status:: " + stepExecution.getStatus());
		return stepExecution.getExitStatus();
	}

	@Override
	public void beforeStep(StepExecution arg0) {
		logger.error("************before step****************");
	}

}- Till now we have created all building blocks for our application viz reader, processor, model, etc. Let’s revisit our configuration file – BatchConfig and create a meaningful job that will run. Below is the code for our configuration file:
@Configuration
@EnableBatchProcessing
public class BatchConfig {

    @Autowired
    JobBuilderFactory jobBuilderFactory;

    @Autowired
    StepBuilderFactory stepBuilderFactory;

    @Autowired
    public ProductProcessor productProcessor;

    @Autowired
    public ProductReader productReader;

    @Autowired
    StepCompletionNotificationListener stepCompletionNotificationListener;

    @Bean
    public JdbcBatchItemWriter<Product> writer(DataSource dataSource) {
        return new JdbcBatchItemWriterBuilder<Product>().itemSqlParameterSourceProvider(new BeanPropertyItemSqlParameterSourceProvider<>())
            .sql("INSERT INTO product (product_name, product_description, price) VALUES " + "(:productName, :productDescription, :price)")
            .dataSource(dataSource)
            .build();
    }
    @Bean
    public Step step1(JdbcBatchItemWriter<Product> writer) {
        return stepBuilderFactory.get("step1")
            .<Product, Product> chunk(10)
            .reader(productReader)
            .processor(productProcessor)
            .writer(writer)
            .listener(stepCompletionNotificationListener)
            .build();
    }
    @Bean
    public Job loadProductsJob(JobCompletionNotificationListener listener, Step step1) {

        return jobBuilderFactory.get("loadProductsJob")
            .incrementer(new RunIdIncrementer())
            .listener(listener)
            .flow(step1)
            .end()
            .build();
    }
}
Here, we are injecting factories for Job & Step along with all other components which we have created viz. reader, processor, etc. then we will define a step and a Job that will be consuming the step:
- Creating a STEP: to create a step we will use a StepBuilderFactory and specify the chunk which is nothing but a batch size which is effectively number of records reader will read and pass to writer and then we inject reader, processor, listener & writer and finally build the step
- Creating a JOB: to create a job we will use a JobBuilderFactory and pass incrementer, listener,step and flow with step and build the same
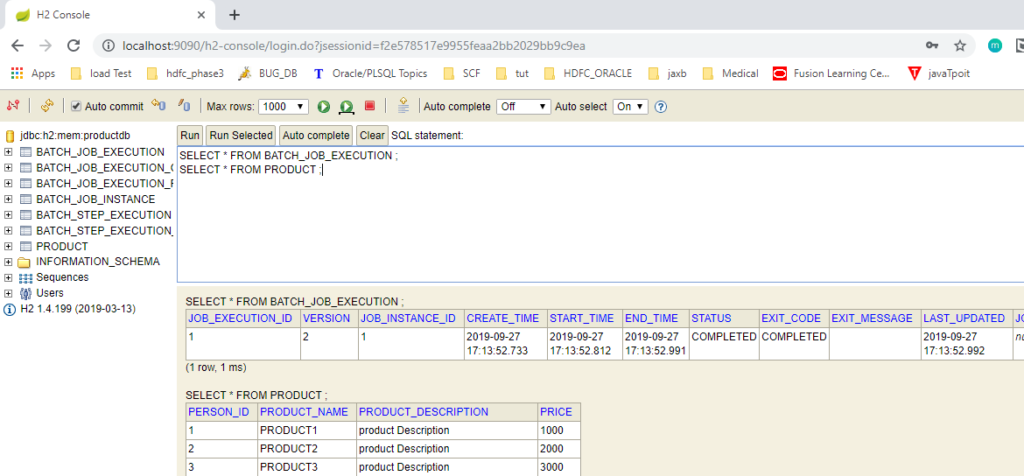
- To check the metadata of the job tables and PRODUCT table– Till this step data has been loaded from CSV file to h2 database. We will use h2 console, which is available to us by spring devtools, to check if the data has been properly loaded.We need to specify the connection details in the application.properties file like-
server.port=9090
# Database config
spring.datasource.url=jdbc:h2:mem:productdb
spring.datasource.driverClassName=org.h2.Driver
spring.datasource.username=sa
spring.datasource.password=password
spring.jpa.database-platform=org.hibernate.dialect.H2Dialect
spring.h2.console.enabled=true
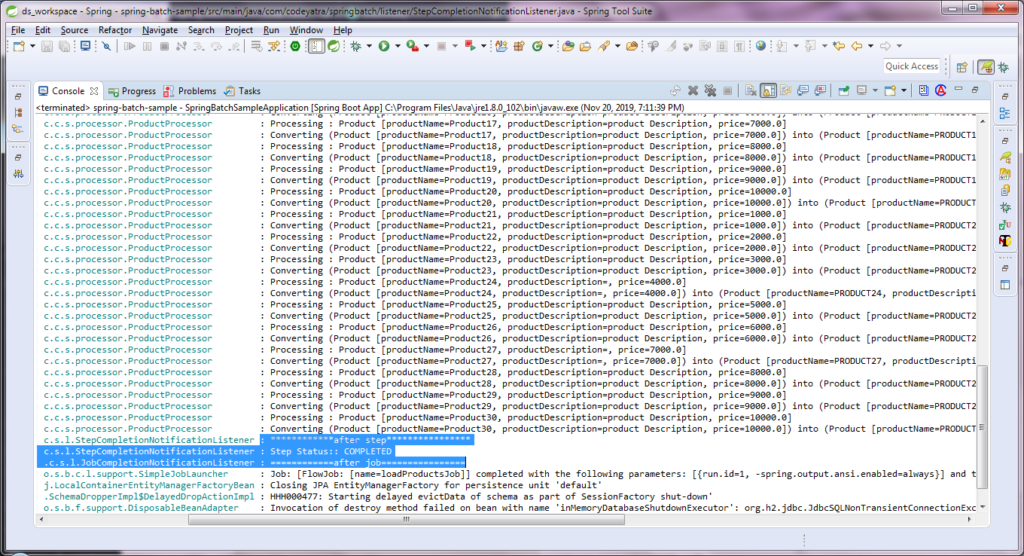
Once the server is up, the job gets executed automatically and, the console shows the messages from the listener and other components:

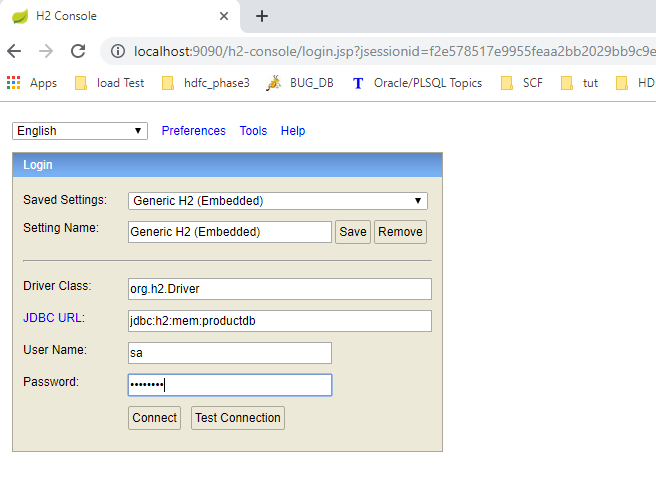
To access the console visit http://localhost:9090/h2-console/ and specify the username & password to query tables.


6. Conclusion
In this first hands-on example of spring batch, we have seen a way to create a Spring Batch application and load the data from a CSV file to the database. The code of this example is available on github.
Stay tuned for some advanced features of Spring Batch.If you have any queries or suggestion please let us know in the comments section.
The first method defines the job, and the second one defines a single step. Jobs are built from steps, where each step can involve a reader, a processor, and a writer.
Hi there to all, how is all, I think every one is getting more from this site, and your views are nice designed for new users. Allina Tobin Libbie
My wife and i have been really joyful when Peter managed to round up his web research while using the precious recommendations he made out of the site. It is now and again perplexing to simply happen to be giving for free solutions that people could have been trying to sell. We really consider we have the website owner to give thanks to because of that. Most of the illustrations you made, the straightforward web site navigation, the relationships you will help to instill – it is most remarkable, and it’s assisting our son in addition to us know that that content is cool, which is certainly quite essential. Thanks for all the pieces!